Over my many successes and failures in houseplant care, I’ve learned one simple truth: The more light you can heap on your plants, the easier they grow.
Pretty astute, I know.
But beyond getting the other things right (water, humidity, soil, and fertilizer), the quality of light your plants receive will always be the main limiting factor for robust, never-ending growth.
With my little houseplant family in tow, I’ve moved around several times throughout my adult life and each place had a certain uniqueness of light quality. Swinging from the extremes of high to low light settings, I’ve seen how the intensity and duration of light exposure scales directly with the health and growth of the indoor garden.
I’ve lived in in upper story apartments with unobstructed southern and western exposures. There, my houseplants lived their best life, growing huge and hale and constantly pushing the limits of their pots. It was easy. All I had to do was keep them watered and fertilized, and in return they pushed out so much growth that I was forever giving away cuttings and offsets– to friends, to acquaintances, to a donation box set out at the curb.
I’ve also lived in first floor flats, where every single window faced a wall or was shaded by a balcony, roof, or awning. Here, the very same plants struggled. Alive yes, but you could hardly call it thriving – more like limping along. There would be no more curbside freebies, anyway. Every shred of light was precious and we installed columns of plant shelves across the windows to capture as much of it as possible. Still, supplementing with cool white LEDs was the only way to satisfy the high light needs of my Croton and Aloe.
It’s all too tempting to start believing you’ve mastered houseplant parenting when you have rooms bathed in bright light for most of the day. It is truly humbling when you move and experience the fresh hell of plant care in sub-optimal lighting!
This is all to say, the fewer things getting between the sun and your plants, the better. Trees, buildings, curtains, privacy film, and dirty windows are the sorts of things that could be standing in the way. Each contributes a dimming effect on the amount of UV light that gets through to the leaves – even in the prime location of a south-facing window.
Not too much you can do about the permanent structures. But washing your windows and trimming overgrown shrubbery can make a noticeable difference in the amount of sunlight that’s let into your rooms.
There’s another little trick for boosting the sunlight plants can absorb. And it’s dead simple, costs almost nothing, is criminally underrated and is usually only mentioned in passing: Clean your plant leaves.
Dusting Your Way to Better Photosynthesis

The biological reason for light quality having such an impact on plant vigor is explained by good ol’ photosynthesis – the process plants use to convert light into energy so they can grow and grow and grow.
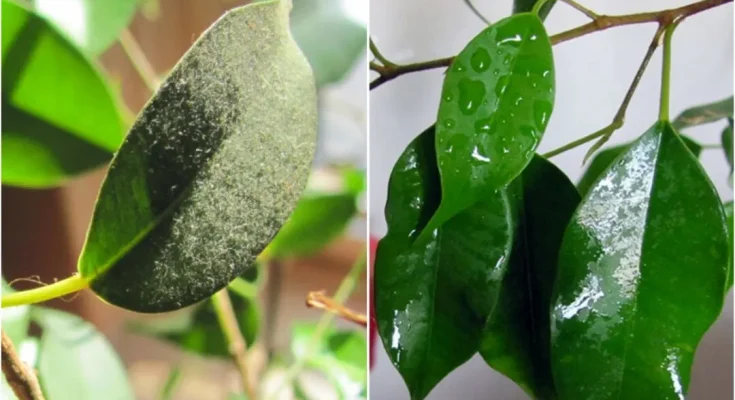
Like any other physical barrier to sunlight, a layer of dust will most certainly reduce the maximum potential for light to reach the leaves.

And when you’re light-challenged, every little bit of sunshine will only help fuel plant growth. Plus, squeaky clean leaves look a lot nicer than dusty old dull ones.
Rain and wind keeps plants clean outside. But in the shelter of the indoor garden, our houseplants 100% rely on us to practice good leaf hygiene.
You might not realize how much dust has accumulated on plant foliage until you take a hard look at the leaves in bright light. In passing, my plants didn’t appear all that dusty. But once I inspected the foliage closely in strong daylight, I was immediately disabused of that notion.
When Was the Last Time You Cleaned Your Houseplants?

No, I don’t mean knocking off dust with the swipe of a finger. What I mean is, when was the last time you set aside a bit of time to specifically wash the dust, dirt, and grime off the leaves?
If your answer is ‘Never’ or ‘I do not recall’, then it might be high time to invest in a little leaf care.
How frequently you clean the leaves depends on how much dust gets into your home, from shedding humans and pets, as well as through windows and doors. The pluckiest of indoor gardeners might clean their plants on a monthly or weekly basis, though doing it at least one or two times a year is a good habit to get into.
Right around the deep cleaning in spring is when I tend to start thinking about the cleanliness of my plants. The appearance of clean foliage looks so much better, and my plants will be happier and healthier without dust cluttering up their leaves.
9 Easy Ways to Keep Houseplants Clean
I’ll be first to admit, cleaning plants is kind of a pain. Every plant grows in its own particular way and a single cleaning method doesn’t usually work for all of them.
A damp cloth is great for scrubbing dust off plants with big, broad, and thick leaves. It doesn’t work so well on plants with small leaves, prickly spines, or fuzzy textures. Some plants require a more delicate touch.

The key to making the dusting endeavor go quickly and smoothly is matching the cleaning implement to the each plant’s leaf type and growth habit. By tailoring your approach to the shape, size, and number of leaves, the chore of plant dusting becomes a whole lot simpler.
1. Damp Cloth
Let’s get the most obvious one out of the way. A damp cloth is the go-to household cleaner for a reason and it’s certainly a sensible pick for dusting off your big leaf plants.

It makes quick work of clearing debris from the leaf surface. Supporting the backside with your hand, gently wipe down the leaf, following the veins to the edge. Don’t forget to do both sides of each leaf.
There’s no need for soap, just a soft cloth moistened with plain water is enough to make plant leaves go from dull to brilliant.
2. Paintbrush
A paintbrush is a grand thing for cleaning large plants with a tad more precision.
Soft and flexible paintbrush bristles gently clear away dust from dimples and grooves along a bumpy leaf surface. It slips past long thorns and needles to clean the skin of big cacti like Saguaro and Barrel cactus, quite painlessly.
And for the more fragile foliage that would tear with too much pressure, a paintbrush is supple enough to tidy up irregularly shaped leaves with deep lobes and perforations.
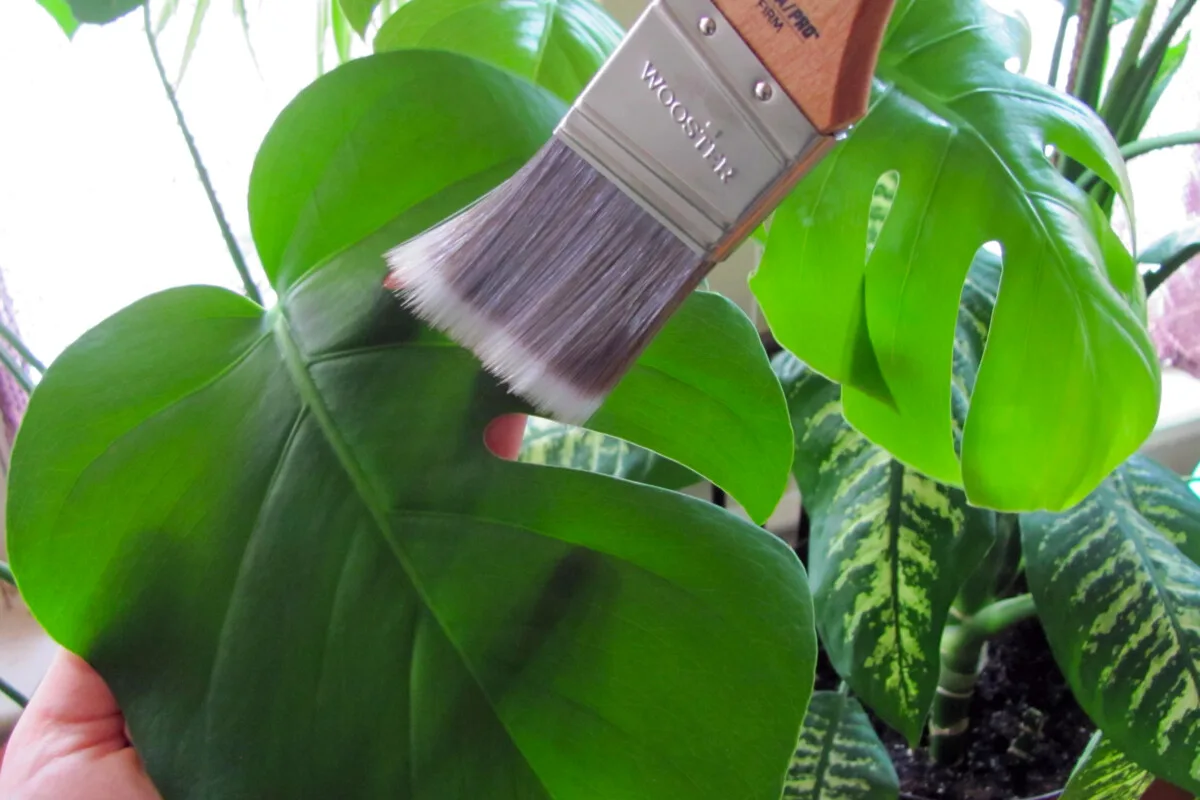
Find a fresh paintbrush and match it up with the size of the leaf. Dip the end of the bristles in water and ‘paint’ the plant by following along the natural shape of the leaves.
3. Dusting Gloves
More challenging to clean are the plants with soft and pliable medium-sized leaves. To dust them effectively, the backside of the leaf needs to be supported so the topside can be scrubbed. This becomes fairly time-consuming if you’re using a damp cloth as your plant duster.
But what I’ve found works better is a a pair of cheap dollar store knit gloves . With these on, you can rapidly dust off plants with opposite or alternate leaves on a long stem, two leaves at a time.

Slip on the dusting gloves and moisten your fingertips with water. Start at the bottom of the plant and grasp both opposing leaves, rubbing the front and back of the foliage. When these leaves are clean, move on to the next set, onward and upward, until your reach the top of the stem.
4. Socks
If you don’t happen to have dusting gloves, a pair of old socks are a perfectly suitable stand-in. Slip ‘em on like mittens and prepare to get a lil handsy with your plants.

Socks are ideal for cleaning plants with long and linear leaves, the kind you can dust by running your hand along the leaf with a single swipe.
Where dusting socks really excel, though, is at dislodging debris from the rigid and tall leaves of Snake plants in one fell swoop. Beginning at the base, apply a light amount of pressure and wipe up the length of each leaf.
5. Toothbrush
A soft-bristled toothbrush can be a versatile cleaning tool for several kinds of plants.
You can use it to clean plant leaves that have a fuzzy or furry texture like African violets. Or thick and fleshy succulents. Or plants that grow from the inside-out in a rosette.

With a toothbrush, you can easily squeeze the bristles into the spaces where leaves overlap to clear away soil and other trapped debris.

6. Cotton Swab
The most ornery of all the houseplants, it’s the cacti that will pose your most serious dusting test yet. Don’t let those sharp needles deter you from giving your cactus plants a clean bath.
Compressed air is commonly recommended for knocking off dust from cactus plants while protecting your skin. I’ve tried it and it didn’t work for me – it mostly kicked up the soil while the dust on the stems stayed put.
What does works for me is a cotton swab, dipped in water. It’s efficient and keeps your hand up and away from the prickly parts.

7. Artist Paintbrush
Cleaning cactus flesh is one thing. Clearing away fluffy particles, caught and held by clustered needles is a whole other animal.
When you want to clear trapped dust from the cactus needles themselves, a small artist paintbrush with a tapered tip is a good bet.

Don’t be afraid to be a bit aggressive about it. Use a stiffer brush and rapid sweeping movements to oust the stubbornest bits of dust.
8. Spritz in the Sink
For plants that don’t at all mind having their leaves soaked, a long spritz with water is about the most effortless way to rinse the dustiness away.
It’s the best and quickest method for cleaning up tropical houseplants that would be far too tedious to wipe each leaf individually, like ferns, palms, and viners.
And for smaller specimens, still in their baby to juvenile stage, spraying them with water is an especially gentle way to clean.

Ruining the finish on not one, but two wooden tabletops has taught me to never spray down my plants in situ. I highly recommend rounding up your small to medium sized plants and crowding them in the sink before you spray. Then let the foliage dry a bit before returning them to their normal places.
9. Shower in the Tub
Of all the ways to clear dust off your plants, the shower treatment has to be the most expedient for cleaning a ton of leaves at once.
Haul in your biggest guys and gals, your long trailing vines, and your many-leaved and mature floor plants, and set them along the bottom of your bathtub or shower stall.
As long as your pots have drainage holes and your shower pressure isn’t too strong, it’s the easily the ‘don’t work hard, work smart’ way to clean plants. A lukewarm shower can dust hundreds of leaves in one go and give the fam a deep watering at the same time.

It so happens that not all of my planters have drainage holes. No problem, they still are moved to the tub. Instead of getting showered, they are heavily spritzed with a spray bottle until the water drips down their leaves. This’ll gussy up the foliage without the risk of waterlogging the soil – or disrespecting my wood surfaces.
What About Shining the Leaves?
Myriad plant beautification products are on the market today, including leaf shine sprays formulated with neem, plant extracts, or essential oils. All promise they’re safe for plants and will impart a long-lasting glossy luster to the leaves.
Homemade leaf shines, made with oat milk or banana peels or mayonnaise, are also touted as natural ways to polish and buff up foliage to a brilliant sheen.
There’s a couple problems with leaf shine products, regardless of whether you buy or DIY:
- Oils leave behind a residue that can clog up leaf stomata, the tiny pores on the surface of leaves. For photosynthesis to occur, these pores need to breathe in order to exchange oxygen and CO2. With enough oily coatings of leaf shine, leaves can’t photosynthesize properly and the plant’s health will ultimately suffer.
- Oils are sticky. Leaf shine products will attract more dust to your plant foliage.
Even soap has the potential to gum up the stomata, so be sure to rinse the leaves well if you use any kind of product to clean your plants.
For me, I only use water to clean my houseplants. Plain water is the closest thing to rain after all. And if that’s good enough for the outdoor garden, surely it’s more than fine for our indoor ones.
