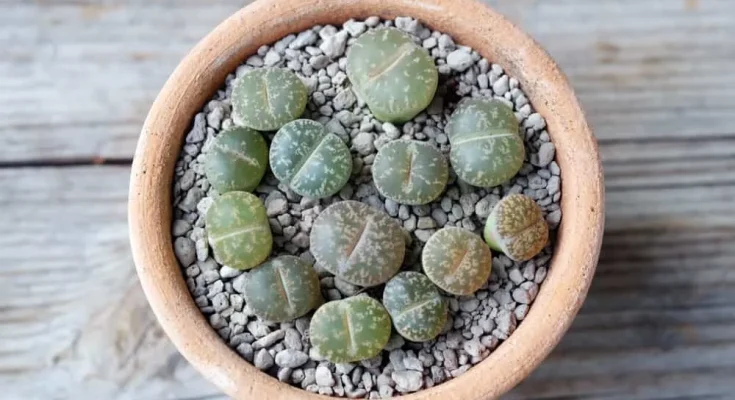
The title of Most Unusual Succulent has to go to Lithops.
Not only do they look wildly different from any other succulent – resembling stones, hooves, or tiny brains – they also have a fascinating structure and can survive with little to no water for extensive periods.
Because these plants are so unusual, many gardeners find them difficult to care for. However, once you understand the basics, Lithops can be one of the lowest maintenance (and strangest-looking) plants in your entire garden.
What on Earth are Lithops?

Lithops are native to southern Africa, where they can be found hiding amongst rocks in grasslands or dry, sandy areas. They are commonly referred to by their scientific name which comes from Ancient Greek – líthos meaning stone and óps meaning face. You can call them stone-face if you like, but Lithops seems far easier.
Each plant has thick, fused leaf pairs with almost no stem, connecting to a deep root system.
In the wild, the majority of the leaf is buried underneath the soil to protect the plant from harsh sun and predators (their low profile allows them to blend in with other rocks, so much so that even biologists find them difficult to spot).
The tops of the leaves – known as leaf windows – are translucent to allow light to reach all parts of the leaf underground for photosynthesis.
Flowers emerge from the crevice between the two leaves. Each plant produces one flower per lifecycle after 3-5 years.

Once the flower dies back, a seed capsule forms in the center of the leaves, which ejects seeds from the plant when exposed to moisture. New leaf pairs also emerge from the split in the plant, slowly taking up moisture from the dying leaves as they grow, to start the process all over again.
Lithops Care

When compared to the care of other home-grown plants, Lithops largely take care of themselves. Unfortunately, that’s often where the problem comes in.
We’re so used to fussing over our plants and wondering whether we are caring for them correctly, that we tend to overdo it sometimes. That can quickly lead to a Lithops’ demise.
Keep your distance, follow these simple care tips, and you should have your Lithops for years.
Light

Like all succulents, plenty of sun vital for growth. Lithops need 4-5 hours of direct sun per day and partial sun in the afternoons to prevent scorching.
Some ambitious gardeners grow Lithops as houseplants. You may want to try it, but you’ll need to ensure they have plenty of light throughout the day. Under low light conditions, Lithops’ leaves will stretch toward the nearest light source and become distorted, known as etiolation. Little light can also dull the color of the leaves (which is arguably the best part of the whole plant).
Lithops are not fans of a change in environment. When moving your plant to a different area, alter the conditions gradually so it has time to adjust to the light levels. These plants – like many people you probably know – don’t like surprises.
Water

Lithops are no strangers to drought. In some areas with little rainfall, they often receive no water for months on end.
To survive in these conditions, Lithops’ leaves act as tiny water reservoirs, storing enough water to feed the plant. To keep your Lithops happy, mimic their natural seasonal rainfall conditions and resist the panicked urge to water all the time. If the soil is dry – good. They like it that way.
In the summer and winter months, don’t water your Lithops at all. They go dormant or semi-dormant at these times and watering is likely to cause root rot.
Only consider watering during summer if the tops of the leaves begin to wrinkle (a sign of lack of water). Be cautious when doing so and water as little as possible. The smallest amount will be enough to return the leaves to their plump, happy state.
During spring and fall – the growing seasons – start watering with a tiny amount of water every couple of weeks. In high-humidity areas, you may not need to follow this step as the plant can absorb enough moisture from the air.
It probably goes without saying after all the no-water talk, but it’s vital to keep your Lithops away from rain or any drips overhead (from gutters, for example). You don’t want to go through the painstaking trouble of not watering, only to have the weather ruin your hard work for you.
Temperature

Lithops are not fans of winter. Or cold temperatures (I tend to agree with them). In their natural environments, cold temperatures are uncommon and cause serious damage to the plant.
When exposed to low temperatures, the cell walls of the plant leaves break. Any exposed sections typically rot and die off.
Lithops like temperatures around 65-85F, with some wiggle room above and below those thresholds for short periods of time. Don’t leave them in temperatures below 50F, or over 100F, for too long to avoid risking damage to the leaves.
Soil

The soil in Lithops’ natural environment ranges from sandy to almost completely rocky. They are very tolerant of ‘poor quality’ soils – in fact, that’s what they’re used to.
A gritty, well-draining mix is ideal; the less water it holds, the better. Use a standard cactus potting mix or make your own by combining 50% potting mix with a mixture of sand, rock, and perlite.
Fertilizing

Generally, it is best not to fertilize your Lithops – mostly because they don’t need it, but also because they are not used to it. Fertilizing is likely to do more harm than good.
Some gardeners like to apply fertilizer once over the growing season to promote flowering. When applying fertilizer for this purpose, do so sparingly. Use a heavily diluted cactus fertilizer, not a regular fertilizer, as it will burn the leaves. If your plant is not flowering, it could be the result of age. Some Lithops will only flower after 5 years of growth.
Pests and Diseases
When it comes to Lithops problems, pests and diseases are not common ones. In fact, most plant diseases have no effect on Lithops, and pests are likely to ignore them altogether in favor of your tastier plants. But, if you’re one of the unlucky few that encounter a pest problem, here’s how to combat them:
- Spider mites: Spider mites hide in the crevice between the lithops leaves or around the edges of the plant. To remove them, apply an insecticidal or suffocate them with a mixture of dish soap and water (oil-based products are not recommended as sun exposure could burn the leaves).
- Mealybugs: Remove by hand or suffocate with the same method above.
- Aphids: The juicy leaves of the Lithops may attract aphids, which can also be removed by hand or with an insecticidal product.
Lithops Propagation

The easiest way to propagate Lithops is by seed, but they can also be propagated by division in certain circumstances. Although it’s the preferred method of propagation among many gardeners, leaf-cutting is not an option. Each plant only has two of them – it would be like removing a limb.
You can either purchase Lithops seeds or harvest seeds from your own plant.
During the flowering season, cross-pollinate manually using a small brush by transferring pollen from one plant to another. When the flower dies back, the plant should produce a seed capsule in the center that will open when exposed to water. Sprinkle the seeds over gritty soil in a separate pot and cover them with a light layer of sand. Keep the soil slightly moist until germination.
A cluster of Lithops can also be propagated by division, although finding or growing a cluster large enough for separation is not particularly common.
Remove the plant from the pot and shake off any soil around the roots. Cut the roots between each leaf pair gently to separate them into individual plants and repot.
Lithops are incredibly slow-growing plants. You may not see the fruits of propagation for several months or years. It’s a long-term investment, but definitely a worthwhile one.
With low-maintenance requirements, an interesting structure, and a look that makes the non-gardeners stop and ask, ‘wait, are you growing rocks?’ – it’s hard not to want a garden full of Lithops.
There are almost 40 varieties, each with its own patterns and quirks – the perfect collector’s item for gardeners and houseplant lovers.


