Gardening is a beautiful way of making more space for nature in our lives. Many gardeners want to grow more plants that add food and shelter for wildlife. But a limited budget can be an obstacle to growing the garden of your dreams. Enter stem cuttings for growing an endless supply of plants.
Plants have a kind of magic. You can take a small piece off a plant and grow a whole new plant with it.
And it can all be done for free.
The trick is knowing how to take stem cuttings, when to take them, and what conditions they need for the best chance of success.
I’ve been propagating new plants from my favorites for years now. This lets me share them with friends and family and even sell a few.
I’ve learned a few things along the way, including a few tricks that will save you hours of time and effort. So, read on to learn the easiest way to fill your backyard for free.
What Types of Cuttings to Take

You can propagate new plants from different parts of your current plants, depending on the time of year and the type of plant. The four basic candidates for the process include
- Stem cuttings
- Leaf cuttings
- Root cuttings
- Leaf bud cuttings
Learning to take stem cuttings and leaf bud cuttings is one of the best ways to begin propagating new plants. It’s one of the easiest to learn and where most gardeners start when mastering this cost-cutting technique.
Types of Stem Cuttings
To propagate most of your current plants, you’ll want to learn the four types of stem cuttings:
Herbaceous Cuttings

These are taken from plants with non-woody stems, like annual and perennial flowers or tropical houseplants.
These root quickly, sometimes in just a few weeks. They need a moist, warm environment to “strike” and develop roots.
Softwood Cuttings
Softwood cuttings come from new growth on woody-stemmed plants, like Mediterranean herbs such as rosemary and many flowering shrubs. Take softwood cuttings in late spring or early summer after the plant is well leafed out.
These root more quickly than more mature stems from the same plants, but they can dry out easily, and must be kept in a warm, humid place until they develop roots.
Semi-Hardwood Cuttings
Once the stems have become tougher in midsummer through autumn, you can take semi-hardwood cuttings to propagate new plants. This method is good for flowering vines and shrubs.
They will need a moist medium and adequate humidity to root. However, they’re not as quick to wilt as softwood cuttings.
Hardwood Cuttings

Take hardwood cuttings from fruit trees, deciduous bushes, and vining flowers in the winter when the plants are dormant.
This method requires patience and isn’t always as successful, but it’s also one that requires very little effort.
How to Take Stem Cuttings
Some of the fundamentals for getting good cuttings that will root are:
- Take your cutting below a node for rooting (proximal end)
- Ensure you have at least two or three nodes on your cutting
- Trim semi-hardwood and hardwood cuttings at the top (distal end)
- Remove excess leaves if necessary
- Make sure you know which end of the cutting is which.
That last one can be the most challenging. I can’t count how many cuttings have ended up on the compost heap because I lost track of which end was which.
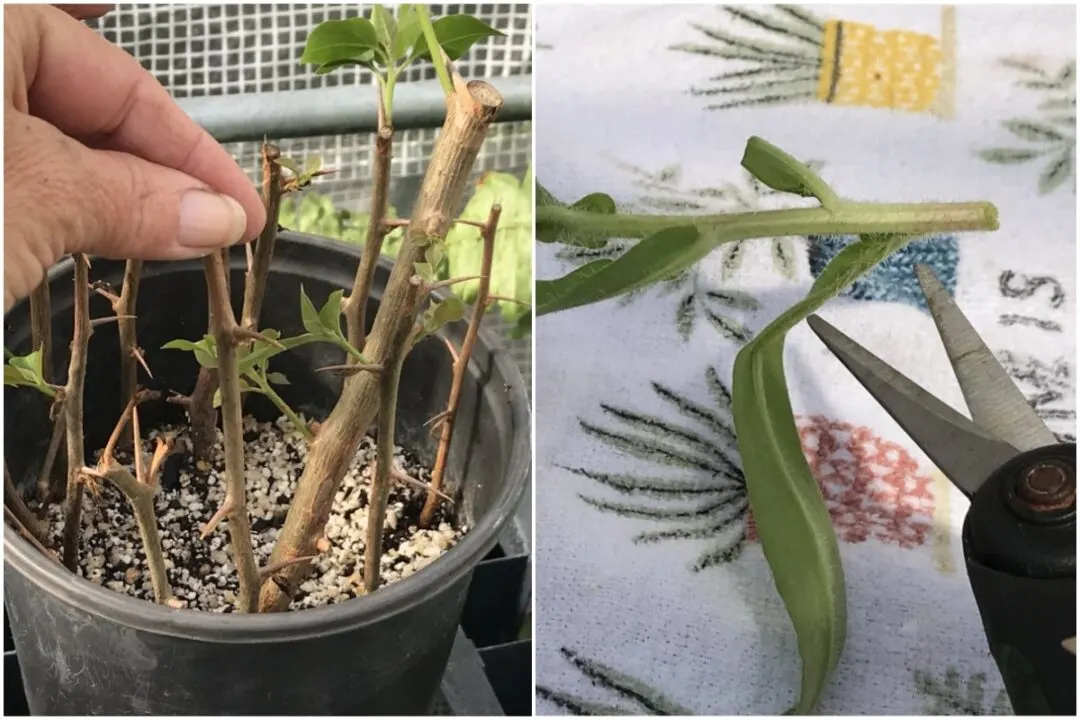
The secret I’ve finally discovered is to make the bottom cut (below a node) at a steep angle and the top cut straight across.
Not only does this prevent you from planting them upside down, but it also provides more surface area for roots to develop along the angled cut.
Preparing Your Stem Cuttings

I can’t believe how many times I’ve pushed into exhaustion trying to get all my cuttings into moist pots as soon as humanly possible.
But most plants benefit from some callusing after cutting.
There’s no race to get them into warm, wet potting soil and tented up before they croak.
In fact, my strike rate for cuttings has doubled in the last couple of years since I learned to just relax and let them dry out a bit.
Once you remove the cutting from the mother plant, you can trim it, dip it in rooting hormone, and then let it sit in a warm, dark place for a few hours or even a few days.
You can even make your own natural rooting hormone using this guide from Lindsay Sheehan.

How long plants need to callus depends on how sturdy the stem is and how quickly they dry out.
Herbaceous and softwood cuttings dry out quickly and shouldn’t be left very long before planting into the mix. They may last several hours out of the sun and with misting.
Semi-hardwood cuttings can sit for days. Hardwood cuttings for weeks.
A study published in Garden Product News showed that when allowed to callus, perennial flowering plants were ready for potting up a full week earlier. Like me, the researchers also experienced a much higher success rate with their cuttings after callusing.
Provide Stem Cuttings with Conditions for Rooting
While rooting plants in water is the cheapest and easiest, a soil-like mix (or “sticking mix”) results in healthier plants. Plants rooted in a “soil-like” mix will develop denser and more fibrous root systems.
They’ll also suffer much less transplant shock when they are transferred out into your garden.
My favorite pro tip is to add mycorrhizal fungi into the sticking mix to encourage faster rooting. I use Espoma Bio-Tone Starter and recommend it highly.
Containers for Propagation

You can propagate several cuttings in one large container if you’re going for a big batch of plants. You can use a regular plant pot with adequate drainage holes.
The trick here is to place them along the outside edge of the pot. The soil is warmer on the outside of the pot, which helps improve and speed up rooting.
It also seems to stay moister, though I couldn’t tell you why.
Do allow about 1.5 to 2 inches between cuttings along the edge. Too close, and they can begin to rot due to poor air circulation.

You can also propagate plants in individual containers. I experimented with some clear plastic drinking cups last fall.
I drilled drainage holes on the cup on the bottom and used another on top to work as a humidity dome. I loosely taped the top cup to the bottom and placed them in a low-lit warm corner of the greenhouse over the winter.
While I admit it looked a bit like a grade-school science project, only one or two cuttings failed in the process.
So, I’m doing it again this spring.
Setting Up Your Cuttings

Find a container for holding your sticking mix and make sure it has drainage holes. Add your mix and saturate it well with clean water.
I’ve found soaking my containers in a shallow pan of water allows the mix to fully hydrate.
This step is crucial since many of the ingredients for propagation media can become downright hydrophobic when completely dried out.
Sticking Your Stem Cuttings
If using a large pot, take a chopstick or bamboo stick to poke holes in the sticking mix around the edge, every 2 inches.
Drop your prepared cuttings into the holes. Make sure you have both the cut end and at least one additional node under the soil line.
If using individual containers, you can follow your preference and place the cutting at the edge or the center.
Water the container well to wash the soil around the cutting stem.
Providing Light, Heat, and Moisture

Most cuttings will thrive in bright but indirect light. I call this “dappled shade,” and it should mimic the light levels you’ll find under a large shade tree.
Herbaceous and softwood cuttings need warmth and high humidity to root. You can tent them with a plastic bag to preserve moisture in the pot. Place the containers somewhere warm with moderate light.
When they offer some resistance when you tug on them gently, they’ve developed roots. You can remove the cover. Once they develop new growth, you can start hardening them off for life outdoors if the weather is suitable.
Experiment with All Your Favorites and Save Money

Once you have the basic materials, feel free to experiment with the different plants in your yard. You’ll need sharp secateurs, plenty of containers, and some coconut coir and perlite. And all of those can be sterilized and reused over and over again.
I’ve tried several brands of rooting hormone, and I must be honest — the cheapest one worked better than the expensive “professional” product.
Propagating plants from cuttings can become a bit addictive. Once you get started, you may find it hard to stop.
You may find yourself standing in parking lots eyeing the landscape shrubs.
You may decide you need a pen knife on your keychain.
You may even find yourself stuffing local flora into your purse and pockets.
Be careful out there.
I don’t think the title of your article matches the content lol. Just kidding, mainly because I had some doubts after reading the article.